
Ivy Everywhere! Learn How to Propagate Ivy Like a Plant Expert: The world of ivy is far more expansive than meets the eye. From the classic English ivy to the vibrant Boston ivy, these versatile climbers offer a spectrum of colors, textures, and growth habits.
Whether you’re seeking a cascading groundcover, a verdant wall accent, or a captivating hanging basket, ivy provides a solution for every landscape design. This comprehensive guide delves into the art of ivy propagation, empowering you to create a lush, verdant haven filled with these resilient and rewarding plants.
This guide provides a step-by-step approach to ivy propagation, encompassing everything from selecting the ideal parent plant to nurturing your newly propagated ivy to its full potential. We’ll explore the various propagation methods, including cuttings, layering, and seed starting, highlighting their respective strengths and weaknesses.
Armed with the knowledge and tools to successfully propagate ivy, you can unlock a world of horticultural possibilities, transforming your garden into a vibrant tapestry of ivy-laden beauty.
The Allure of Ivy
Ivy, with its lush, evergreen foliage and adaptable nature, has captivated gardeners and landscape designers for centuries. Its versatility and aesthetic appeal have made it a popular choice for a wide range of applications, from covering bare walls to cascading down fences.
Varieties of Ivy
Ivy, belonging to the genus Hedera, encompasses a diverse range of species and cultivars, each boasting unique characteristics and appeal.
- English Ivy (Hedera helix):This classic variety is known for its dark green, lobed leaves and its ability to climb walls and structures. It is highly adaptable and thrives in a variety of conditions.
- Irish Ivy (Hedera hibernica):With larger, more robust leaves than English ivy, Irish ivy is a vigorous grower, ideal for covering large areas. Its deep green foliage provides a lush backdrop for other plants.
- Boston Ivy (Parthenocissus tricuspidata):While technically not true ivy, Boston ivy shares similar climbing habits and foliage characteristics. Its distinctive three-lobed leaves turn brilliant shades of red and orange in the fall, adding a splash of color to the landscape.
- Variegated Ivy:Several ivy varieties feature leaves with contrasting colors, such as white, yellow, or cream, adding visual interest and brightening shady areas.
Versatility in Landscaping
Ivy’s versatility extends beyond its aesthetic appeal. Its ability to cling to surfaces makes it an ideal choice for vertical landscaping, covering walls, fences, and trellises. Its trailing habit makes it suitable for ground cover, cascading over slopes and edges.
- Vertical Accents:Ivy’s climbing ability allows it to transform bare walls into lush, green features. Its dense foliage can provide privacy and sound insulation, creating a more intimate and serene atmosphere.
- Ground Cover:Ivy’s trailing growth habit makes it an effective ground cover, suppressing weeds and erosion. It can be used to soften harsh edges, create pathways, and add texture to the landscape.
Benefits of Growing Ivy
Beyond its aesthetic appeal, ivy offers several practical benefits for gardeners and the environment.
- Erosion Control:Ivy’s dense root system helps to stabilize soil, preventing erosion on slopes and embankments.
- Shade Provision:Ivy’s dense foliage can provide shade, reducing heat stress and creating cooler microclimates in gardens.
- Wildlife Habitat:Ivy’s dense foliage provides shelter and nesting sites for birds and small mammals, contributing to biodiversity in the garden.
Propagation Methods
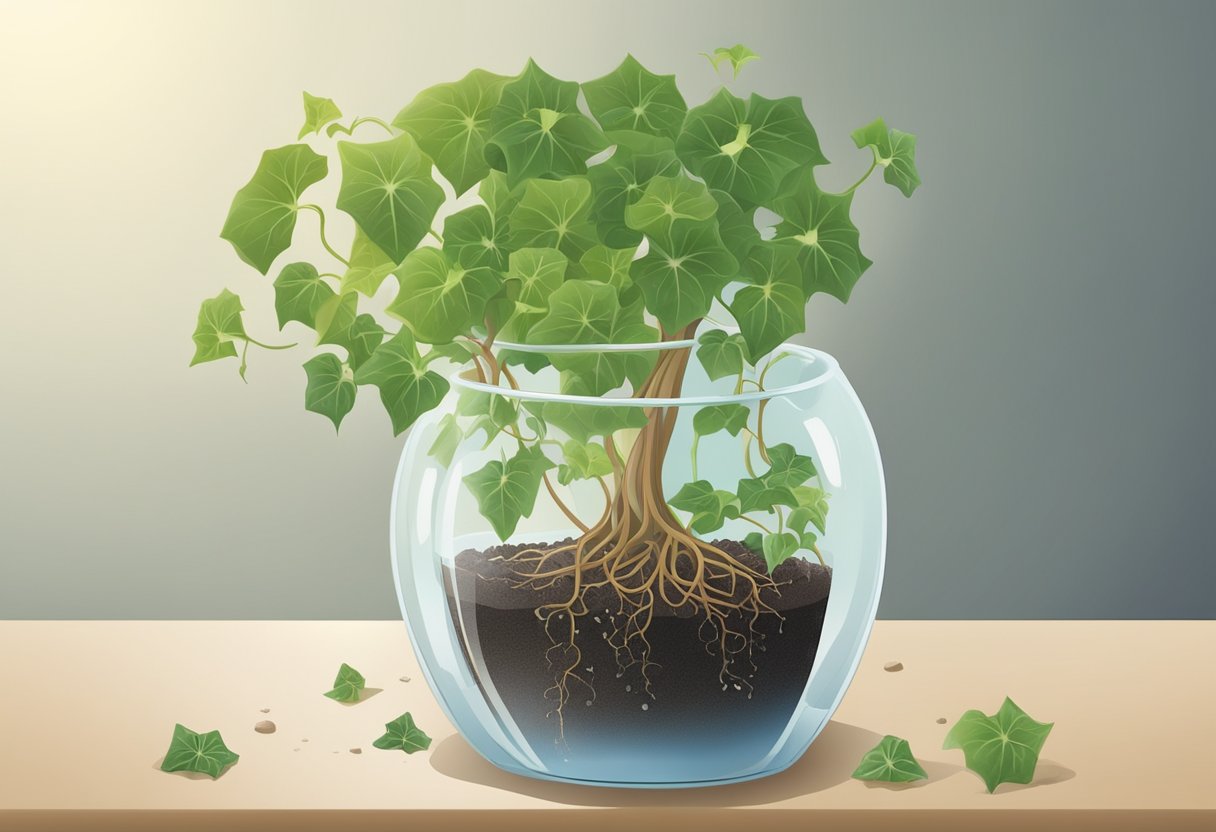
Ivy, with its vibrant green foliage and tenacious nature, is a popular choice for gardeners and indoor plant enthusiasts alike. One of the most appealing aspects of ivy is its ease of propagation, allowing you to expand your collection or share the beauty of this versatile plant with others.
This section delves into the various methods for propagating ivy, offering a comprehensive guide to ensure success in your plant-growing endeavors.
Cuttings
Cuttings are the most common and effective method for propagating ivy. They involve taking a section of a healthy stem and encouraging it to develop roots. The process is relatively straightforward and yields a high success rate, making it an ideal option for beginners.
Taking Cuttings
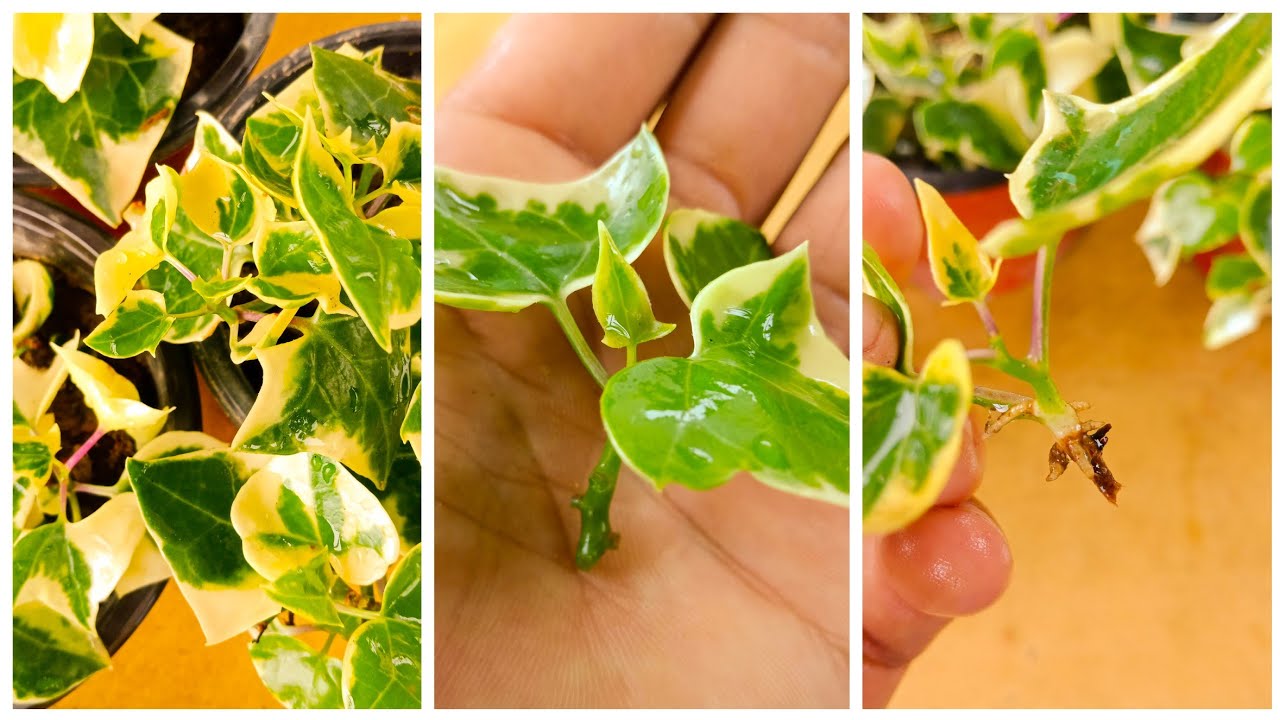
- Select a healthy, non-flowering stem from the current season’s growth. Look for a stem that is firm and has several nodes (the points where leaves emerge).
- Using a sharp, clean knife or pruning shears, make a cut just below a node. The ideal length for a cutting is 4-6 inches.
- Remove the leaves from the bottom 1-2 inches of the stem to create a bare section for root development.
Rooting Cuttings
- Prepare a rooting medium, such as a mix of peat moss and perlite or a commercial rooting hormone. The medium should be moist but not soggy.
- Dip the cut end of the stem in rooting hormone, if desired. Rooting hormone can help stimulate root growth.
- Insert the cuttings into the rooting medium, ensuring that the bare section is covered. Gently tamp down the medium around the base of the cutting.
- Cover the cuttings with a clear plastic bag or dome to create a humid environment that promotes root development.
- Place the cuttings in a bright, indirect light location and keep the rooting medium consistently moist.
- Roots should develop within a few weeks, at which point the cuttings can be transplanted into individual pots.
Layering
Layering is a method of propagating ivy that involves encouraging roots to develop on a stem while it is still attached to the parent plant. This method is particularly effective for ivy because of its trailing growth habit.
Air Layering
- Select a healthy stem on the parent plant and make a shallow cut about halfway through the stem.
- Gently peel back the bark above the cut to expose the cambium layer, which is responsible for root development.
- Wrap the cut area with a moist sphagnum moss and secure it with plastic wrap or aluminum foil.
- Keep the moss consistently moist by misting it regularly.
- Roots should develop within a few weeks to a few months, depending on the time of year and the type of ivy.
- Once roots have formed, cut the stem below the rooted section and plant the new plant in a pot.
Seed Starting
While less common than cuttings or layering, propagating ivy from seeds is possible. This method requires more time and patience, but it can be a rewarding experience.
Starting Seeds
- Sow ivy seeds in a seed starting tray filled with a seed starting mix.
- Gently press the seeds into the soil, but do not cover them completely.
- Water the seeds thoroughly and cover the tray with a clear plastic dome or wrap to create a humid environment.
- Place the tray in a bright, indirect light location and keep the soil consistently moist.
- Ivy seeds can take several weeks to germinate, so be patient.
- Once the seedlings have developed a few true leaves, they can be transplanted into individual pots.
Essential Tools and Materials
Successful ivy propagation relies on a few essential tools and materials that ensure proper care and growth. These tools aid in creating the optimal environment for root development and overall plant health.
Essential Tools
Having the right tools for the job is crucial for a successful ivy propagation project. These tools make the process easier and more efficient.
- Sharp Pruning Shears:These are essential for cleanly cutting healthy stems from the parent ivy plant. Sharp shears prevent crushing or damaging the stem, which can hinder root growth. Look for shears with a bypass design for clean cuts and a comfortable grip.
If you’re looking to expand your green thumb, mastering propagation techniques is key. Ivy, with its easy-to-root nature, is a great plant to start with. But if you’re seeking a challenge with stunning blooms, learn how to propagate roses from cuttings using the methods outlined in this helpful guide, How To Propagate Roses From Cuttings: Easy Methods for Stunning Rose Blooms.
Once you’ve mastered these techniques, you’ll be ready to tackle any propagation project, even the trickiest ivy varieties.
- Sharp Knife or Razor Blade:A sharp knife or razor blade is used to make precise cuts on the stems for rooting. This ensures a clean surface for root formation and reduces the risk of infection.
- Rooting Hormone:Rooting hormone is a powder or liquid that encourages root development. It helps to stimulate root growth and improves the chances of successful propagation. Look for a rooting hormone specifically designed for woody cuttings.
- Gardening Gloves:Gloves protect your hands from thorns and irritants while working with ivy plants. They also prevent the transfer of bacteria or fungal spores to the cuttings.
Essential Materials
The materials you use for propagation provide the ideal environment for root growth and plant development.
- Propagating Medium:A suitable propagating medium is essential for successful rooting. Options include:
- Seed Starting Mix:This sterile mix provides good drainage and aeration for root development.
- Perlite:Perlite is a lightweight, porous material that provides excellent drainage and aeration.
- Vermiculite:Vermiculite is another lightweight material that retains moisture and provides good aeration.
- Water:Water is essential for root growth and plant development. Ensure the propagating medium remains consistently moist but not soggy.
- Clear Plastic Bags or Containers:These are used to create a humid environment for the cuttings. The clear plastic allows for monitoring of root development and prevents excessive moisture loss.
- Potting Mix:Once the cuttings have developed roots, they are ready to be transplanted into a potting mix. A well-draining potting mix is ideal for ivy.
Preparing for Propagation
Successful ivy propagation hinges on choosing the right parent plant and timing the process for optimal results. The quality of the parent plant directly influences the health and vigor of the new ivy plants. Timing, based on the plant’s growth cycle and local climate, plays a crucial role in the success of the propagation process.
Want to fill your home with lush, trailing ivy? Learning how to propagate ivy is the key to creating a botanical wonderland! You can find out how to do it in just a few days with the help of this informative article, Discover How to Propagate Ivy in Just a Few Days!.
With a little know-how, you’ll be an ivy propagation expert in no time!
Selecting Healthy Parent Plants
Choosing a healthy parent plant is essential for successful ivy propagation. Healthy parent plants produce strong, viable cuttings that are more likely to root and develop into healthy new plants. Here’s what to look for when selecting a parent plant:
- Vigorous Growth:Look for a parent plant that exhibits strong, healthy growth. This indicates that the plant is in good health and has the energy to support new growth.
- Disease-Free:Avoid parent plants that show signs of disease, such as yellowing leaves, wilting, or spots. These symptoms can be passed on to the new plants.
- Pest-Free:Inspect the parent plant for signs of pests, such as insects or mites. Pests can damage the cuttings and hinder rooting.
Timing for Propagation
The best time to propagate ivy depends on your local climate and the plant’s growth cycle. In general, spring and early summer are ideal times for propagating ivy.
- Spring:As the weather warms up, ivy plants begin to actively grow. This period provides optimal conditions for rooting cuttings.
- Early Summer:During early summer, ivy plants are still actively growing and have ample energy to support rooting. The warm temperatures and increased sunlight also promote root development.
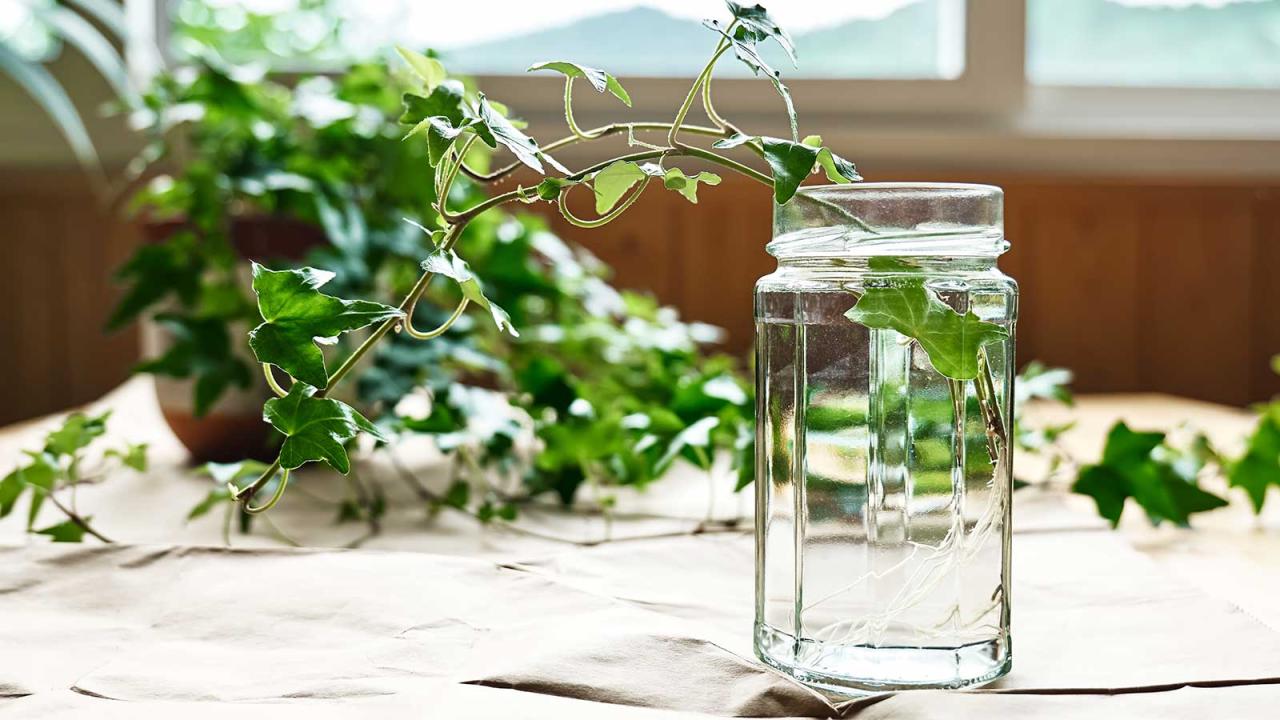
Preparing the Propagation Medium
The propagation medium plays a crucial role in providing the necessary moisture and nutrients for rooting. Here’s how to prepare the propagation medium:
- Soil-Based Medium:A mixture of equal parts potting soil, peat moss, and perlite provides excellent drainage and aeration for rooting. This mixture retains moisture while allowing excess water to drain away.
- Water Propagation:Water propagation is a simple and effective method for ivy. Use a clean glass jar or container filled with fresh water. Change the water every few days to prevent bacterial growth.
- Rooting Hormone:Applying rooting hormone to the cut ends of the ivy cuttings can stimulate root development. Dip the cut ends in a rooting hormone powder or solution before inserting them into the propagation medium.
Cultivating Your New Ivy Plants: Ivy Everywhere! Learn How To Propagate Ivy Like A Plant Expert
You’ve successfully propagated your ivy, and now it’s time to nurture your new plants into thriving vines. Providing the right conditions and care will ensure your ivy thrives and brings a touch of greenery to your home or garden.
Optimal Growing Conditions
Ivy thrives in a range of environments, but understanding its ideal conditions will maximize its growth and health.
Light Requirements
Ivy is adaptable to various light conditions, but it prefers bright, indirect light.
- Direct sunlight:While some ivy varieties can tolerate direct sunlight, it’s best to avoid exposing them to intense, midday sun, as this can scorch their leaves.
- Indirect sunlight:This is the ideal condition for most ivy varieties. Place your ivy plants near a window that receives ample natural light but is not in direct sunlight.
- Low light:Some ivy varieties can tolerate low light conditions, but their growth may be slower and their leaves may become paler.
Watering Needs
Consistent moisture is essential for healthy ivy growth, but overwatering can lead to root rot.
- Watering frequency:Allow the top inch of soil to dry out between waterings. The frequency will vary depending on the size of the pot, the type of soil, and the ambient temperature. During the summer, you may need to water more frequently.
- Watering method:Water thoroughly, ensuring the entire root ball is moistened. Avoid letting water accumulate in the saucer, as this can lead to root rot.
Temperature Preferences
Ivy thrives in moderate temperatures, similar to those found in most homes.
- Ideal temperature range:The optimal temperature range for ivy is between 65°F and 75°F (18°C and 24°C). Avoid exposing your ivy to temperatures below 50°F (10°C), as this can cause damage.
- Temperature fluctuations:Ivy can tolerate some temperature fluctuations, but sudden changes can stress the plant. Try to maintain a consistent temperature environment.
Fertilization and Pest Control
Regular fertilization and proactive pest control are crucial for maintaining the health and vigor of your ivy plants.
Fertilizing Your Ivy
Fertilizing provides essential nutrients to support healthy growth.
- Fertilizer type:Use a balanced liquid fertilizer specifically formulated for houseplants. Avoid fertilizers with high concentrations of nitrogen, as this can encourage excessive leaf growth and weaken the plant.
- Fertilizing schedule:Fertilize your ivy every 4-6 weeks during the growing season (spring and summer). Reduce the frequency to once a month during the fall and winter.
- Over-fertilization:Over-fertilizing can be harmful to ivy. Follow the instructions on the fertilizer label carefully.
Pest Control
While ivy is generally pest-resistant, it can be susceptible to certain pests.
- Common pests:Watch for signs of mealybugs, aphids, spider mites, and scale insects. These pests can suck sap from the plant, causing damage and weakening its growth.
- Pest control methods:Use a mild insecticidal soap or horticultural oil to control pests. Inspect your plants regularly and remove any visible pests manually.
Troubleshooting and Common Issues
While ivy propagation is generally straightforward, certain issues can arise, hindering growth or leading to unhealthy plants. Understanding these common problems and their solutions can ensure a successful propagation experience.
Root Rot
Root rot is a prevalent issue in ivy propagation, often caused by excessive moisture and poor drainage.
- Symptoms:Wilting leaves, yellowing foliage, a mushy stem base, and an unpleasant odor.
- Causes:Overwatering, poor drainage, and using a potting mix that retains too much moisture.
- Solutions:Allow the soil to dry out between waterings, ensure adequate drainage in the container, and use a well-draining potting mix.
To prevent root rot, ensure the potting mix is suitable for ivy and avoid overwatering.
Fungal Infections
Fungal infections can affect ivy cuttings, especially in humid environments.
- Symptoms:Brown or black spots on leaves, powdery mildew, and stunted growth.
- Causes:High humidity, poor air circulation, and contaminated soil.
- Solutions:Improve air circulation around the cuttings, avoid overcrowding, and use a fungicide if necessary.
Regularly inspect cuttings for signs of fungal infections and take appropriate action to prevent their spread.
Pest Infestations, Ivy Everywhere! Learn How to Propagate Ivy Like a Plant Expert
Pests like aphids, mealybugs, and spider mites can attack ivy cuttings, affecting their growth and health.
- Symptoms:Discolored leaves, sticky residue, webbing, and visible insects.
- Causes:Infested cuttings, contaminated soil, or attracting pests from nearby plants.
- Solutions:Isolate infected cuttings, use insecticidal soap or neem oil to control pests, and inspect cuttings regularly for signs of infestation.
Prevention is key. Choose healthy cuttings, use sterilized potting mix, and monitor for pests regularly.
Slow or Stunted Growth
Ivy cuttings may experience slow or stunted growth due to various factors.
- Causes:Inadequate light, insufficient nutrients, incorrect rooting hormone application, and improper watering.
- Solutions:Provide adequate light, use a balanced fertilizer, ensure proper rooting hormone application, and maintain consistent moisture levels.
Optimizing growing conditions and providing the necessary nutrients can encourage healthy growth.
Inspiring Examples of Ivy Landscapes
Ivy’s versatility allows it to be incorporated into various landscape designs, adding a touch of elegance and natural beauty. From cascading down walls to draping over hanging baskets, ivy’s adaptability makes it a popular choice for homeowners and landscape architects alike.
Examples of Ivy Landscapes
The following table showcases a variety of ivy landscapes, highlighting the diverse ways this plant can be utilized:
Image |
Description |
Design Elements |
|---|---|---|
A vibrant green ivy cascading down a brick wall, creating a lush and natural backdrop. The ivy’s trailing vines create a sense of movement and add visual interest to the wall. |
This landscape showcases ivy’s ability to cover large vertical surfaces, adding a touch of greenery and softening the hard lines of the wall. |
Ivy as a climbing plant, brick wall, vertical surface, natural backdrop, trailing vines, movement, visual interest. |
A hanging basket filled with a variety of ivy varieties, creating a cascading display of green foliage. The different textures and colors of the ivy create a visually appealing contrast. |
This example highlights ivy’s use as a hanging plant, adding a touch of greenery and texture to outdoor spaces. |
Ivy as a hanging plant, hanging basket, variety of ivy varieties, cascading display, green foliage, textures, colors, visual contrast. |
A sprawling groundcover of ivy, covering a large area with a dense mat of green foliage. The ivy’s ability to spread quickly and suppress weeds makes it an ideal choice for groundcover. |
This landscape showcases ivy’s use as a groundcover, creating a lush and verdant carpet that suppresses weeds and provides a natural barrier. |
Ivy as a groundcover, dense mat of green foliage, spreading quickly, weed suppression, natural barrier. |
Last Word
By mastering the art of ivy propagation, you unlock a world of horticultural possibilities, transforming your garden into a vibrant tapestry of ivy-laden beauty. Whether you’re seeking a lush groundcover, a cascading wall accent, or a vibrant hanging basket, ivy propagation empowers you to create a landscape that is both visually stunning and environmentally beneficial.
With the knowledge and tools at your disposal, you can cultivate a thriving garden filled with the enduring charm and versatility of ivy, a plant that truly embodies the beauty of nature’s resilience.
Common Queries
What is the best time of year to propagate ivy?
The ideal time to propagate ivy is during the spring or early summer when the plant is actively growing.
How long does it take for ivy cuttings to root?
Ivy cuttings typically take 4 to 6 weeks to root, but this can vary depending on the propagation method and environmental conditions.
Can I propagate ivy from seed?
Yes, you can propagate ivy from seed, but it’s a slower process than cuttings or layering.
